In today’s omnichannel world, your customers don’t interact with your brand in a single siloed environment—they bounce between your website, social media, and physical stores. Marketers who ignore this reality risk sending generic messages that don’t resonate.
But what if you could merge your online (web) and offline (POS) data to create a custom audience that actually reflects real-world behavior?
That’s the magic of blending web and POS behavioral data—and in this guide, we’re breaking it all down. Whether you’re a marketer, CRM analyst, or eCommerce manager, this step-by-step article will show you exactly how to build rich, multi-dimensional custom audiences that convert.
What You’ll Learn
- Why combining Web + POS data is essential for modern audience segmentation
- The key data sources you need (with tools)
- Step-by-step audience creation using real-life examples
- Common pitfalls and how to avoid them
- Tools and platforms that make it easier
Step 1: Understand the Value of Combining Web and POS Data
Before jumping into tools and tactics, let’s look at why this matters:
| Behavior Type | Insight You Gain | Example |
|---|---|---|
| Web Behavior | Intent, interest, content engagement | Customer browses summer shoes on your website |
| POS Behavior | Actual purchase, location, frequency | Same customer bought winter boots last week in-store |
When combined:
- You know this customer is ready for seasonal cross-sell opportunities.
- You can create campaigns that speak to past purchases and current interests.
Real-world Benefit:
If a customer browses athletic wear online but buys casual wear in-store, you can recommend a hybrid lookbook tailored to their style preferences.
Step 2: Identify & Collect Data Sources
A. Web Behavioral Data
Tools: Google Analytics 4 (GA4), Hotjar, Shopify, HubSpot
Key Data Points:
- Pages visited
- Products viewed
- Add-to-cart activity
- Session duration
- Abandonment patterns
B. POS Data
Tools: Lightspeed, Square, Shopify POS, Clover, Toast
Key Data Points:
- Product SKUs purchased
- Transaction value
- Customer ID or email
- Purchase frequency
- Store location
Step 3: Unify Data in a Central Platform (CDP or CRM)
To build a custom audience, you first need to match the same customer across channels.
A. Choose a platform for integration:
- Customer Data Platforms (CDPs): Segment, BlueConic, Treasure Data
- CRMs with integration capabilities: Salesforce, HubSpot, Zoho CRM
B. Use a unique identifier:
- Email address (ideal)
- Phone number
- Loyalty program ID
- First-party cookies (consented)
🔧 Tip: Always ensure your platform is GDPR/CCPA compliant when collecting and storing user data.
Step 4: Define Your Audience Segments
Now the fun begins—crafting smart, relevant segments using combined data.
Example 1: “High-Value Cross-Channel Shoppers”
Criteria:
- Spent > $500 in-store in the last 3 months
- Visited website at least 3 times in the past month
- Viewed premium product category online
Use Case: Target them with early access to VIP collections
Example 2: “Window Shoppers Turned Buyers”
Criteria:
- Abandoned cart on website in past 7 days
- Purchased similar items in-store within 14 days
Use Case: Send them personalized emails showing accessories or complementary products
Step 5: Build and Sync the Audience with Marketing Platforms
Now, push these audiences into your ad platforms or email marketing systems.
Supported Platforms:
- Google Ads / Meta Ads (via GA4 or CDP)
- Email Marketing (Klaviyo, Mailchimp, ActiveCampaign)
- SMS platforms (Attentive, Postscript)
Example Flow:
- Build the audience in GA4 or Segment
- Sync with Meta Ads Manager
- Launch ad campaign with a custom creative for that audience
📊 Pro Tip: Use dynamic creative based on POS purchase category for better personalization.
Step 6: Test, Refine, and Expand
Don’t just “set and forget.”
A/B Test:
- Custom vs. generic audience performance
- Email open/click rates for POS-informed segments
Monitor:
- ROI by audience type
- Engagement trends over time
- Customer lifetime value (CLV) changes after segmentation
Expand:
- Add loyalty status, seasonality behavior, or geo-targeting
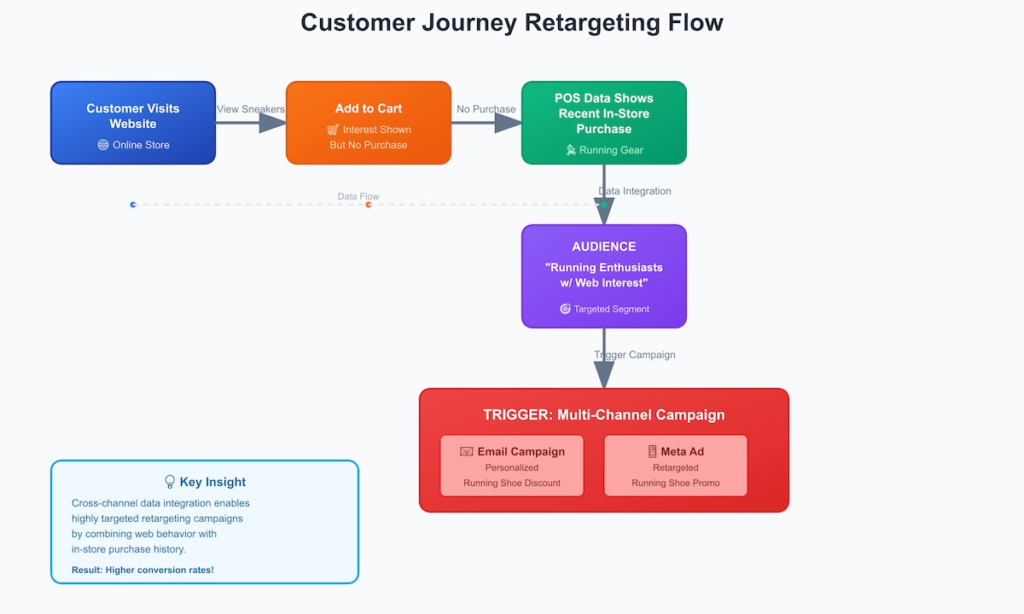
Visual Example: Web + POS Custom Audience Creation
[Customer Visits Website] --(View Sneakers)-->
[Add to Cart] --(No Purchase)-->
[POS Data Shows Recent In-Store Purchase: Running Gear] -->
[AUDIENCE: "Running Enthusiasts w/ Web Interest"] -->
[Trigger: Email Campaign + Meta Ad featuring running shoe discount]
Here’s a simplified flow diagram:
Step 7: Ensure Data Privacy & Consent
⚠️ Critical! Before using any personal data:
- Gain explicit consent (via cookie banners, loyalty forms)
- Keep a record of consent (audit trails)
- Let users opt-out easily
Tools like OneTrust or Cookiebot can automate consent management.
Tools: That Simplify This Process
| Tool | Purpose |
|---|---|
| Segment | Data unification and audience creation |
| GA4 | Behavioral data collection & analysis |
| Lightspeed | POS data source |
| Klaviyo | Email + SMS marketing to custom segments |
| Meta Custom Audiences | Paid targeting |
| Zapier / Make | Workflow automation between tools |
Conclusion
Creating custom audiences that bridge the gap between digital and physical behavior isn’t just smart – it’s essential in today’s fragmented landscape. By unifying your web and POS data, you’re tapping into a goldmine of intent and action that helps you:
- Improve targeting
- Reduce wasted ad spend
- Deepen customer loyalty
- Drive more revenue per campaign
Takeaway:
The future of customer segmentation is not “online vs. offline”—it’s both, together, intelligently.